Friday, January 28, 2011

Natural Dyeing Day

I've just returned from a day of dyeing with the Creative Fibre girls.  There are some wonderful natural dyers amongst the group who offered to teach us newbies a thing or two about dyeing with plants, and using pots for mordants (as opposed to icky chemicals or even your good old household vinegar). 

We rolled up with our fabric /fibre and were treated to a smorgasboard of potted potions made from different plant matter around the region.  If you'd like to give it a go yourself, all you need is a pot (preferably aluminium as this acts as the mordant), some torn/cut up plant leaves/flowers or stems, some water and a stove top.  Pop your plant matter into the pot to steep on a low simmer(overnight if you can as this will produce a stronger brew!).  Place your fabric/fibre/wool into the pot with the plant bits and simmer gently for at least 20 minutes.  Remove your items and leave to cool before rinsing in cool water.  To intensify the colour:  leave your items in the pot overnight, use more plant and less water, pre-soak your wool/fabric/fibre which will allow it to absord the colour more efficiently.  You can use a 'splosh' of white household vinegar in the water which acts as a mordant, but if you're going all natural, it's not essential.

Ah, and here's a little trick Pam told me about for dyeing with plant based fibres such as cotton.  Soak your cotton in soy milk, squeeze out and leave to dry (without rinsing).  Then dye as normal.  The protein in the soy attaches to the cotton fibre and 'tricks' it into thinking that it's a protein (ie wool/silk etc) fibre, so when you dye the cotton the fibre absorbs and holds the colour more efficiently. 


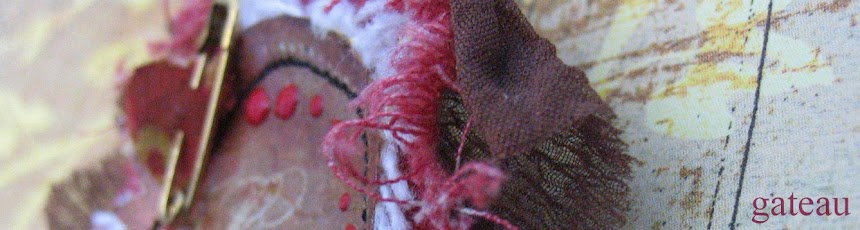
See that delicious pink on the right?  That's some of Sophie's putrid (as in left in the sun to turn rather rancid) red wine.  The colour on the different fabrics is just divine.  It smelt pretty good too!


The sneaky little bit of brown dangling down here is some of the fabric dyed with walnut.  You use the entire walnut (before the outer has been removed to reveil the bit you crack open and eat).  The flax dye worked beautifully to produce a slightly richer brown too, I have a splattered t-shirt to prove it.


The deep orange/red in the top right here is the bits dyed with onion skins.  Nom, nom, nom.  I dyed two lots of fabric in that pot, it was so scrummy and attached itself to the fibres very quickly.


 Here's the one piece of sliver I dyed in the onion skin pot.  It's come out as a halloween inspired subtle orange.  I'm going to start spinning that tonight I think.

I'll pop back in the next couple of days with some more piccies + details of what's been dyed with what, once it's all dry.  Ooh, and this was all dyed with the fabric/fibre being completely dry (not pre-soaked at all).  So imagine the depth of colour you can achieve with soaking first. 

x x x Kate

Wednesday, January 26, 2011

New wee brooches

I've been pottering away on a little set of brooches over the past few days, rummaging through vintage textiles and some new modern goodies that I've aquired.  These little girls are so lovely, and sweet.  They were just calling to be popped onto a quaint wee brooch to grace a persons bosom!  I'm loving working 'small' at the moment.  It's been something that I've had an obsession with since I was a small child.  Remember 'Fraggle Rock' and 'The Borrowers'?  Ah, the start of an obsession I tell you.


And this little brooch decided it needed to be part of the group this week.  The illustration is one I created while completing my design degree many years ago (I won't tell you how many, I'm sure I'm still 26/27ish?).  It is a combination of sculpture and computer graphics.  Dear Romeo and his Juliet, I spent a good part of a year working with the two of them and still have time for the tale.  I love the finished item, the aging medium over the machine embroidery is quite delicious, mmmmmmmmm.  Texture.  Love, love, love texture.


x x x Kate

Friday, January 21, 2011

A bit of textile crafting

I am part of our local Creative Fibre group here in New Plymouth.  We set a group challenge to have an 'envelope swap' late last year, where each participating member contributed an A4 envelope with textile bits n bobs in it.  Each of us then chose our (closed) envelope full of goodies, and had to come up with 'something' created with the contents.  the only additions to be made were sewing thread.

I chose an envelope that was so not me, it was 'almost' funny (yes Sam, I can hear you laughing from here!).  Fluro greens/yellow/reds - um HELP!  So Sam (my partner in crime at Creative Fibre) and I decided to hit the task head on, and got together one weekend to make ourselves get something created.

As you'll find out, I love little things, so decided to chicken out a little and make some small 'cuffs'.  I was pleasantly surprised with the result, albeit with a lot of artisitc lisence used to transform the textiles using a lighter (love this tool lately, you can achieve some really interesting results by melting/burning textiles).
A combination, of cutting away the surface of the felt to expose the lower layer (dark green felt), burning, machine stitching, freying, and hand stitching is used here.  The button is a vintage button from my Nana's sewing tin.


I love the contrast of the soft with the crisp, burnt edges on this cuff.
I've felted together a combination of the fibres to form the new surface used for this cuff.

A Nice Little Place to Visit

Hello.  I'm Kate, this is my wee blog about my arty/crafty habits, and a nice little place to see my collection of things I love.  

x x x Kate